

How To Download Windows 10 Iot Core For Raspberry Pi 3 Without Having A Pc
Getting Started with Windows x IoT Core & Raspberry Pi 3B+
In this post, App Dev Managing director, Robert Schumann shows how to get started with Windows 10 IoT Core with Raspberry Bi 3 B+.
Jumping correct in, permit's get a few matters out of the way upfront.
- This article specifically uses the Raspberry Pi 3 model B+
- If you're not sure what model of Pi y'all're running then review how-to details here: https://www.raspberrypi-spy.co.uk/2012/09/checking-your-raspberry-pi-board-version/
- Topics covered should take most 30 minutes to consummate provided everything you need is readily available.
- Disclaimers
- At present, in that location is no supported version of Windows 10 IoT Core specifically for the Raspberry Pi 3 model B+. This article demonstrates an unsupported technical preview for a Raspberry Pi iii B+.
- I love Pi. For me it's been a true-blue hacker/maker companion for years from which I've learned a lot.
- I work for Microsoft as a Senior Premier Awarding Development Director. Equally such I oft, and increasingly, support not-Windows platforms and open source projects, including cloud-based.
Everything you need (to complete this commodity)
- Laptop or desktop running Windows x
- Raspberry Pi 3 model B+
- 5V 2A microUSB ability supply for Pi
- 8GB or larger Grade ten microSD, with ability to read/write from standard Windows 10 laptop or desktop
- Ethernet cable
- HDMI cable
- USB or proprietary wireless Keyboard for Pi
- USB or proprietary wireless Mouse for Pi
Yous will need the HDMI cable to connect the Pi to a monitor for checking installation status. As well, having a USB keyboard and mouse for installation is suggested in case they're needed for troubleshooting. Technically speaking, a lot of functionality can be achieved through the browser or remote connectedness once the OS is installed.
Install Windows x IoT Core on Raspberry Pi iii B+
At date of writing, there is no supported version of Windows x IoT Core for the Pi 3 B+ model we need to take a somewhat non-linear installation path. Nosotros simply need to brand 1 extra download and complete one out-of-ring job. Beyound that, all steps are the aforementioned.
Using a standard Windows ten laptop or desktop, start by downloading a preview build from here: https://www.microsoft.com/en-us/software-download/windowsiot
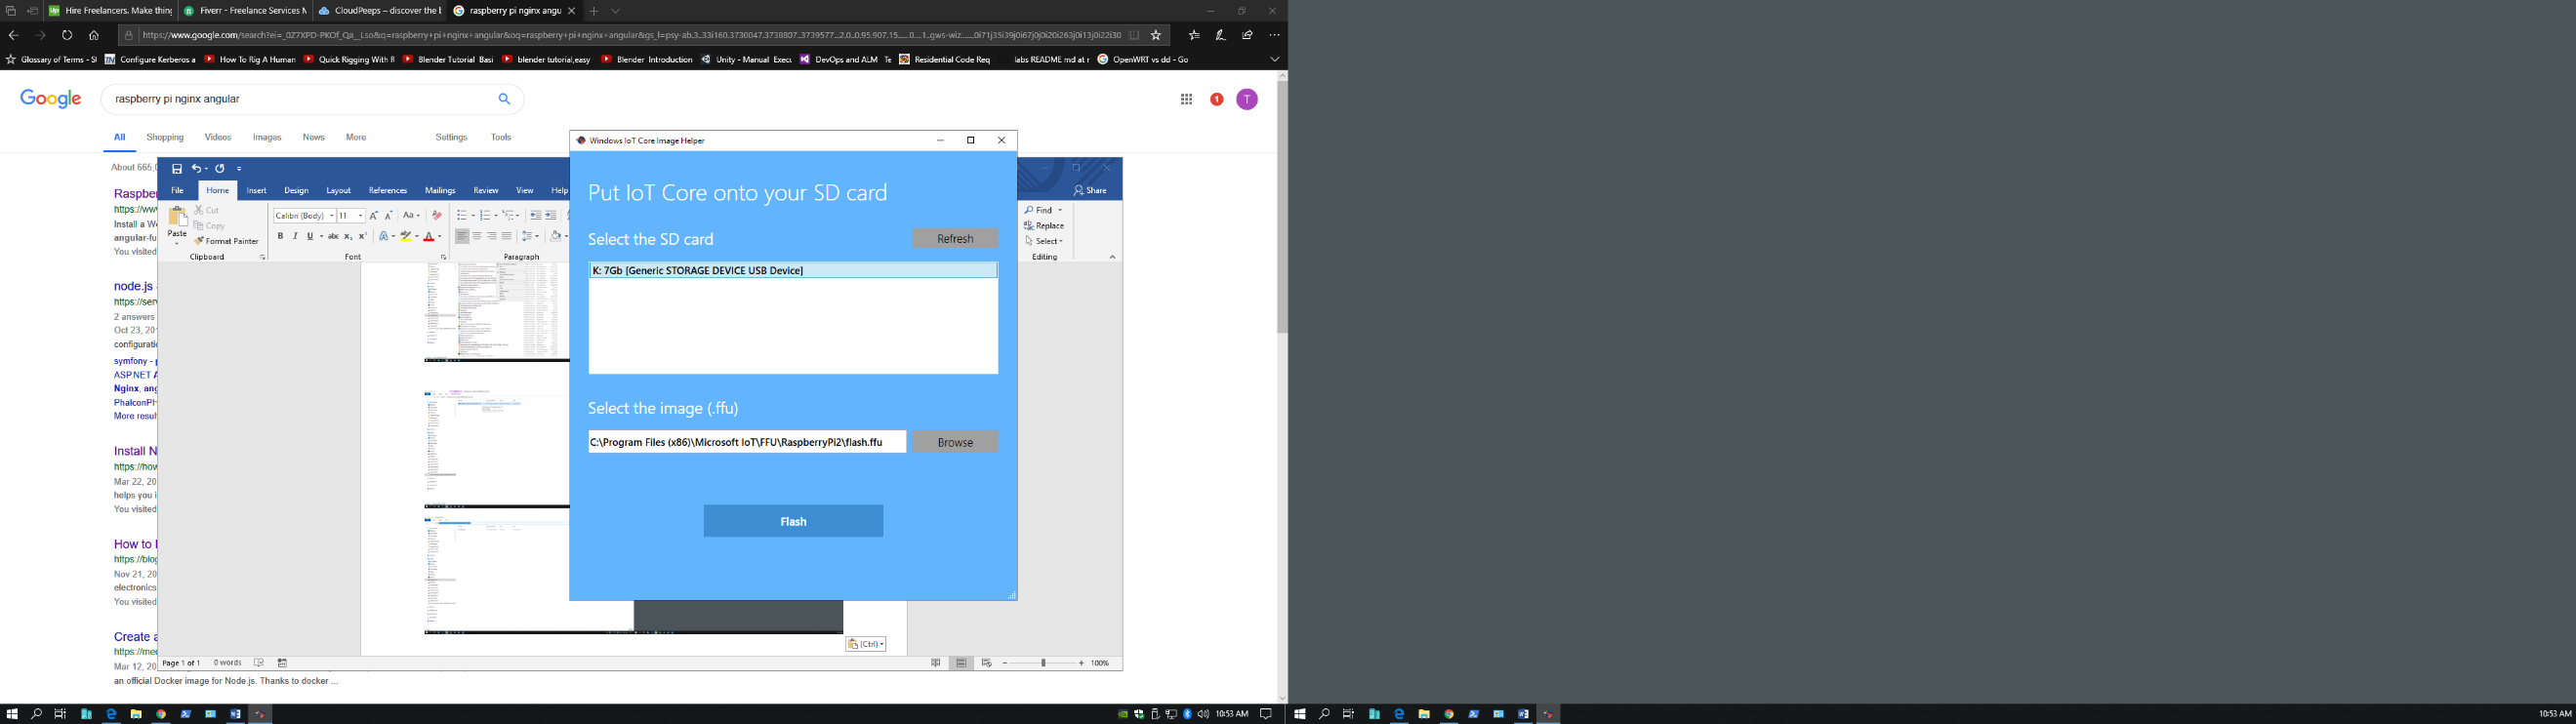
I'm using the latest ISO build version 17661 for this commodity. Once download is complete, right-click to mount the image and access the .msi installer. Because the supported IoT Dashboard cannot be used to setup the Raspberry Pi 3 B+, this "Windows IoT Core Prototype Helper" app is used instead. Double-click the .msi to launch the installer and follow directions, this procedure is straight forward and self-explanatory. By default, the image helper is installed to path C:\Program Files (x86)\Microsoft IoT.
Before launching the image helper app, make sure the microSD carte being used for the Pi is read/write accessible to the laptop or desktop app host system. And so, start the Windows IoT Cadre Image Helper app. In one case started, select the right SD carte du jour. Every bit for the required .ffu file that is located nether the application binder in the FFU directory. Confirm the correct SD menu is selected and the ffu file is identified then click Flash button. Flash will spawn a control dialog that provides percent completion output. Once finished, a notification pops up with overall status. If successful then remove the microSD from the app host system and insert into Pi. Brand certain all Pi hardware is skilful-to-get (monitor, power, mouse, keyboard), then power on the Pi.
And wait….

Comment: At to the lowest degree for me boots are slow even with the understanding this is a Pi. I tried several dissimilar microSD cards of varying vendors, sizes, and specs. Restarts from the box tended to hang so much and then that out of impatience or frustration, I found myself pulling Pi power. Oddly, restarting remotely from the Windows IoT Dashboard worked better than directly on the system.
The initial boot is painfully slow; yous'll become the win logo and spinning donut for about the first 2 minutes, then just a spinning donut for almost another 3-iv minutes. (Think taking abroad the logo was meant to be a lark, like an attempted outset or rest to the "why is this taking and so long" personal timer.) Once the system initially boots, and loads, things get amend depending on where work is beingness managed. I found performance directly on the Raspberry Pi to be frustrating. Luckily there are alternatives…
So at this point, a preview version of Windows x IoT Core was flashed to a microSD, subsequently inserted into a Raspberry Pi 3 B+, which was then turned on, successfully boots, and is at present running. The image helper app is no longer needed, and can exist uninstalled if desired. In case you lot've not read any existing documentation, here's a link that outlines known issues: https://docs.microsoft.com/en-us/windows/iot-core/troubleshooting
Of note:
- No Pi WiFi
- No Pi Bluetooth
- May experience boot problems
That'due south quite a bunch of "OTB awesomeness"! Pressing forward, however, things look promising…
Windows IoT Dashboard
We can now utilize the supported dashboard establish here: https://docs.microsoft.com/windows/iot-core/downloads
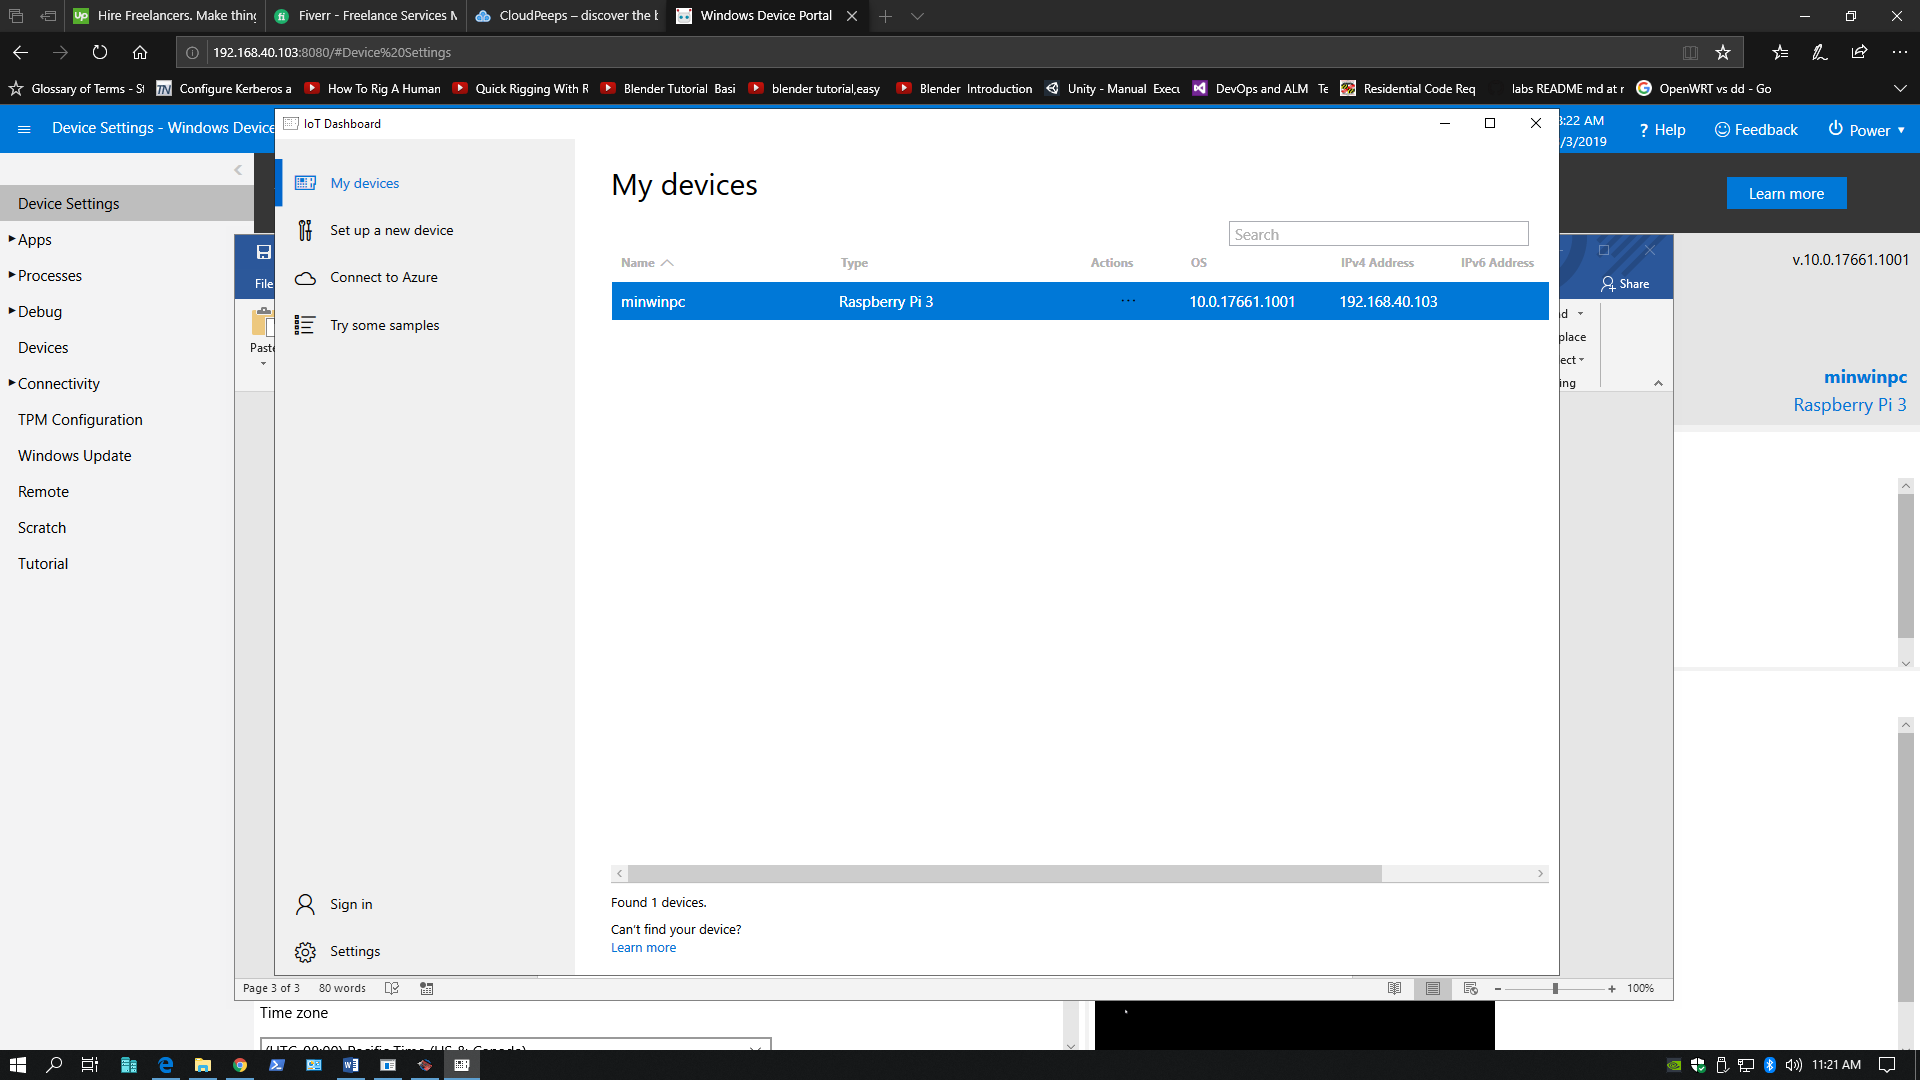

Case: 192.168.1.3:8080
| Default User Name: administrator Default Password: p@ssw0rd | TIP: If your Pi is non listed under My Devices try the post-obit:
|
When the dashboard runs it should display a list of (Windows) IoT devices connected to the network. Your newly implemented Raspberry Pi three B+ should prove. It likely contains default properties such as name and logon account. Double-click the listed Windows IoT Pi device to go to its properties page. From there yous can change the device name and come across the default account. Notice the link to the device portal at bottom, click that link. A browser should pop up the Windows Device Portal for the selected device using an network subnet address at port 8080.
All things considered, the device portal has a decent amount of capabilities and operation. There might be a couple matters to tend to start, such every bit applying updates and tweaking performance.
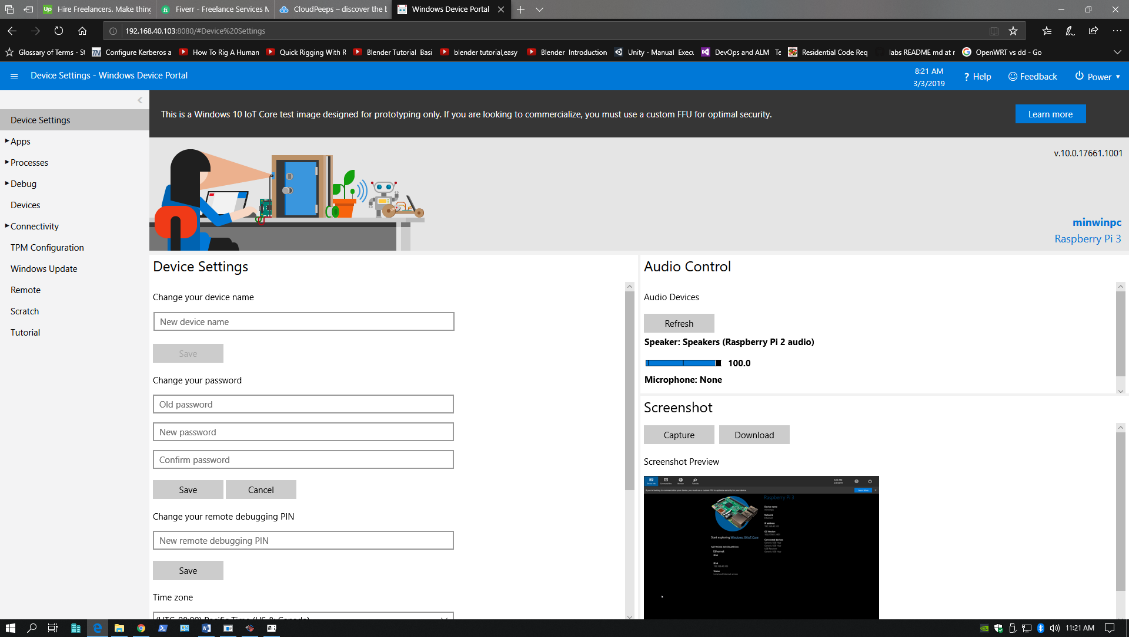 From the device portal page, aggrandize Apps, click Apps Manager, and then click Cheque for Updates. A prompt volition brandish for any outstanding updates, click Ok. Reboots may exist required. Rinse repeat until fully updated in which case the prompt with say 0 updates found.
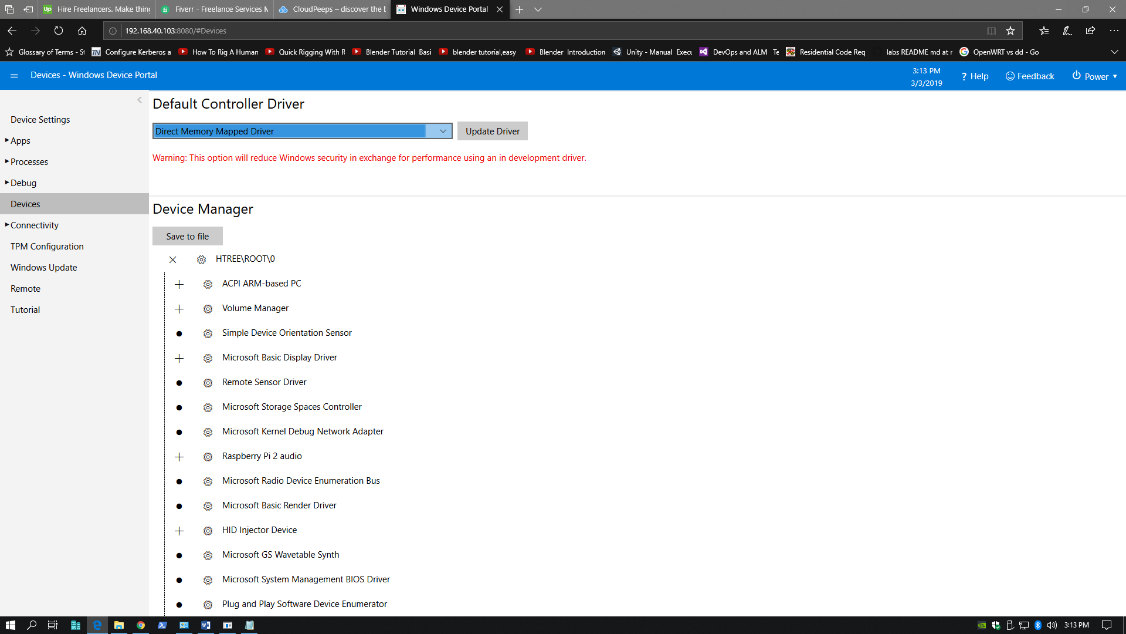 If yous're more concerned near performance than security then modify the default controller commuter. Click Devices left, then on correct from the dropdown select Straight Memory Mapped Driver, click Update Driver. Reboot required.
Remote Connectedness
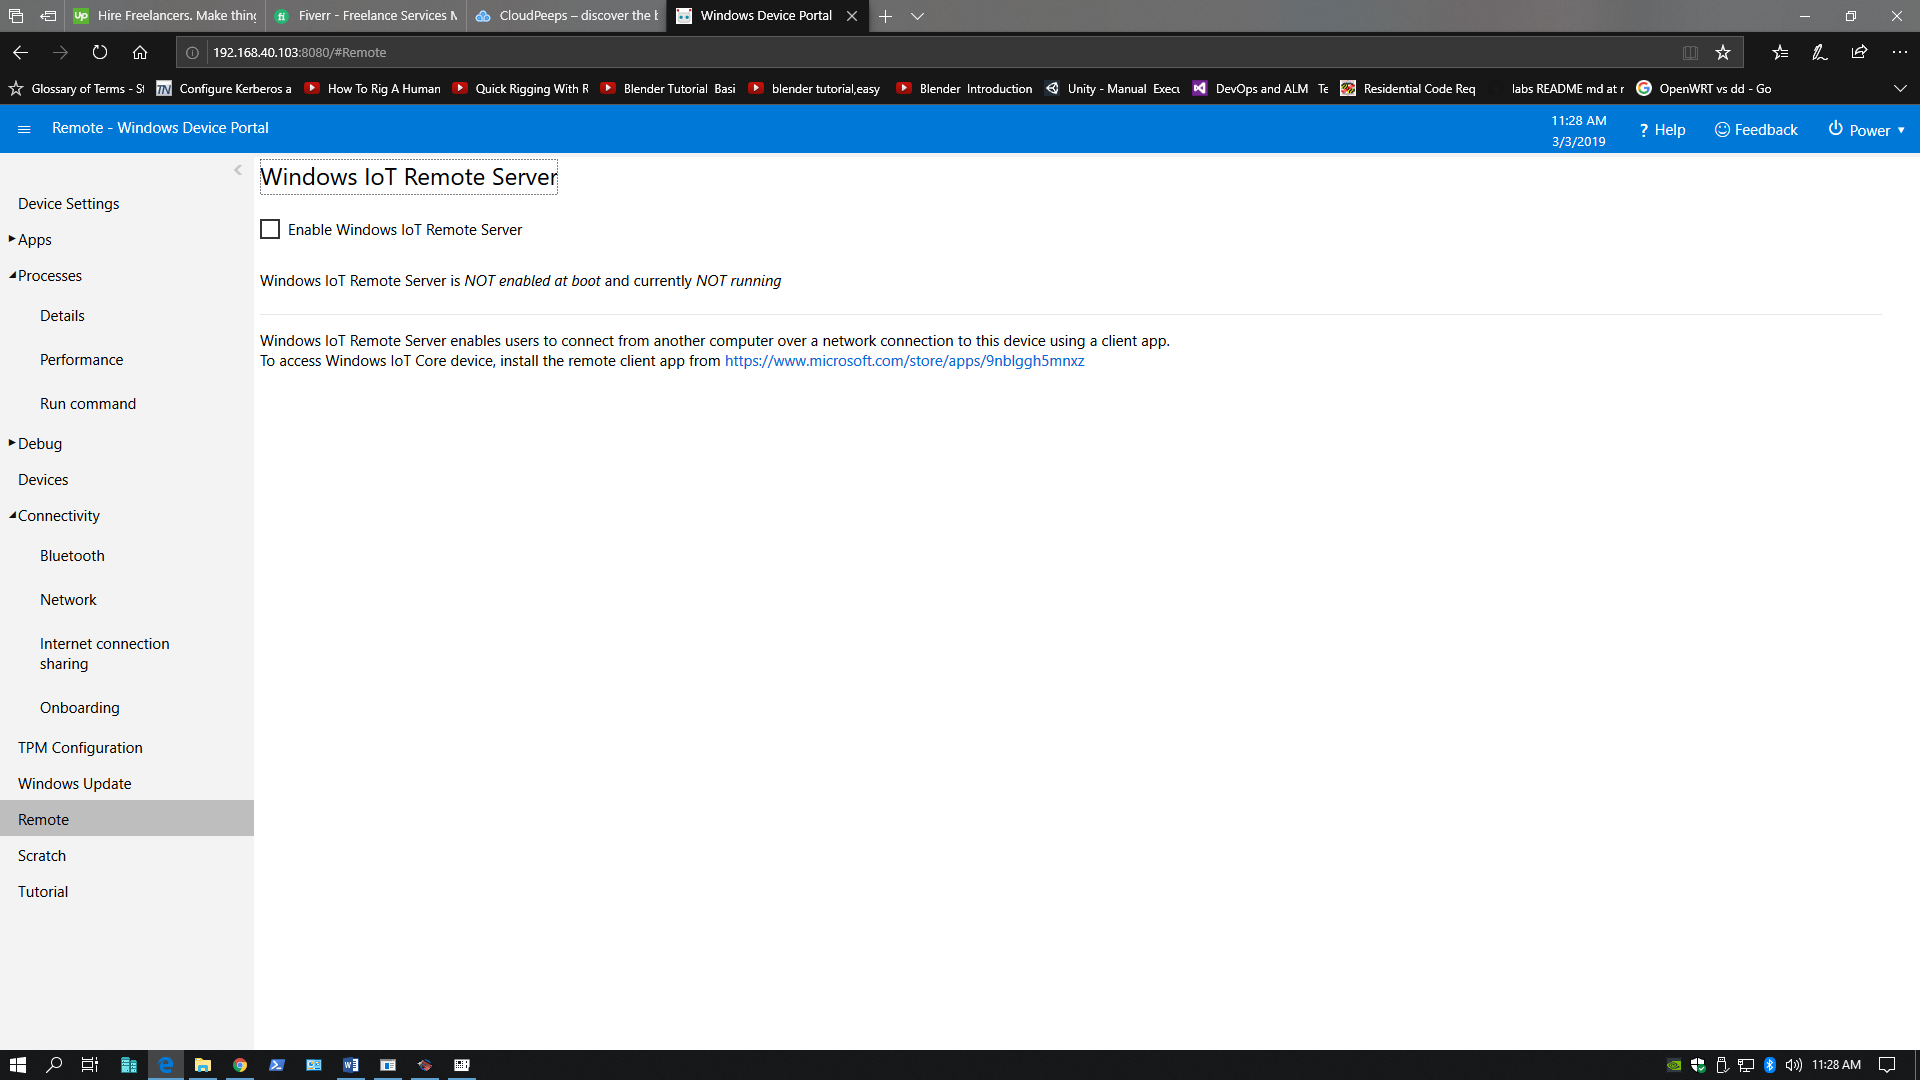
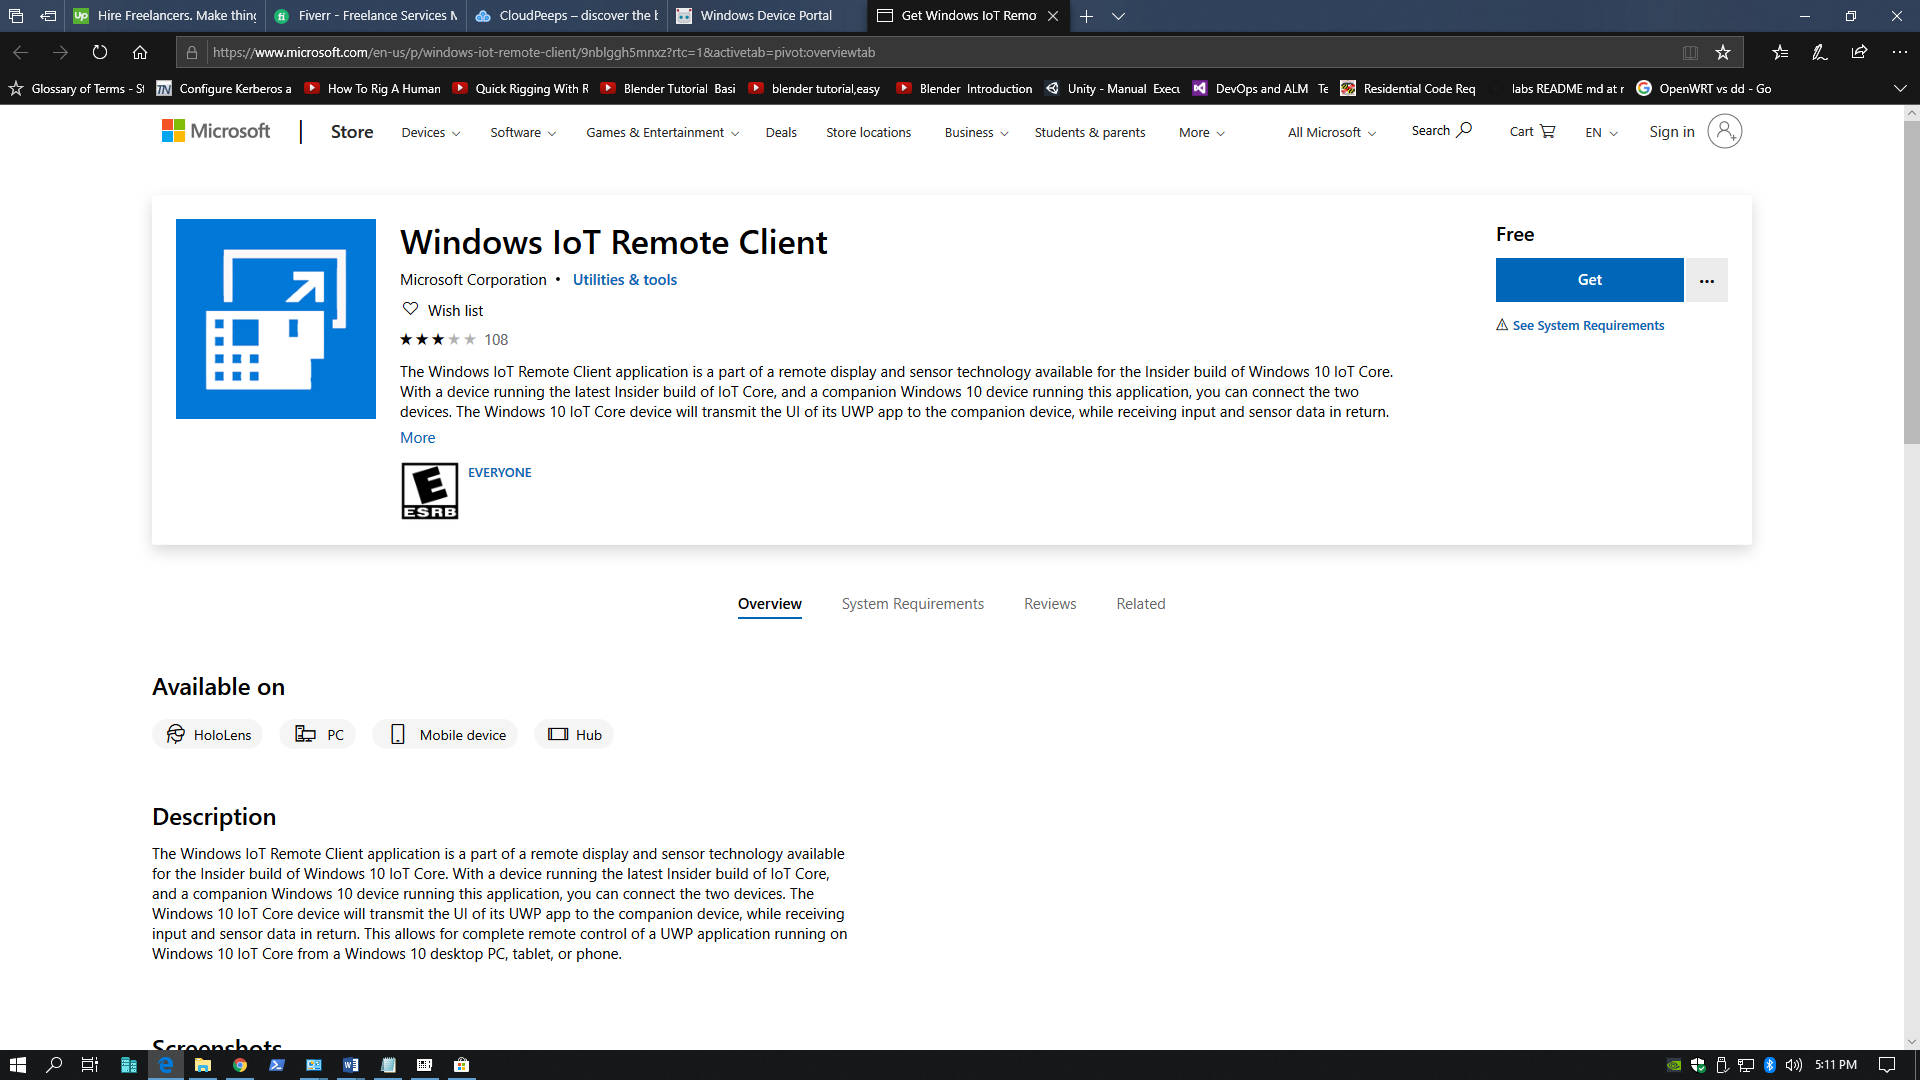 Some other way to connect to the Pi is through the Windows Remote IoT Client application from Microsoft Store. Recommend reading the application's description. Essentially what this app does is receive UI data from the Pi and sends sensor and input data to remotely manipulate the device. Somewhat of a unlike twist on establishing a remote "connection".
Determination
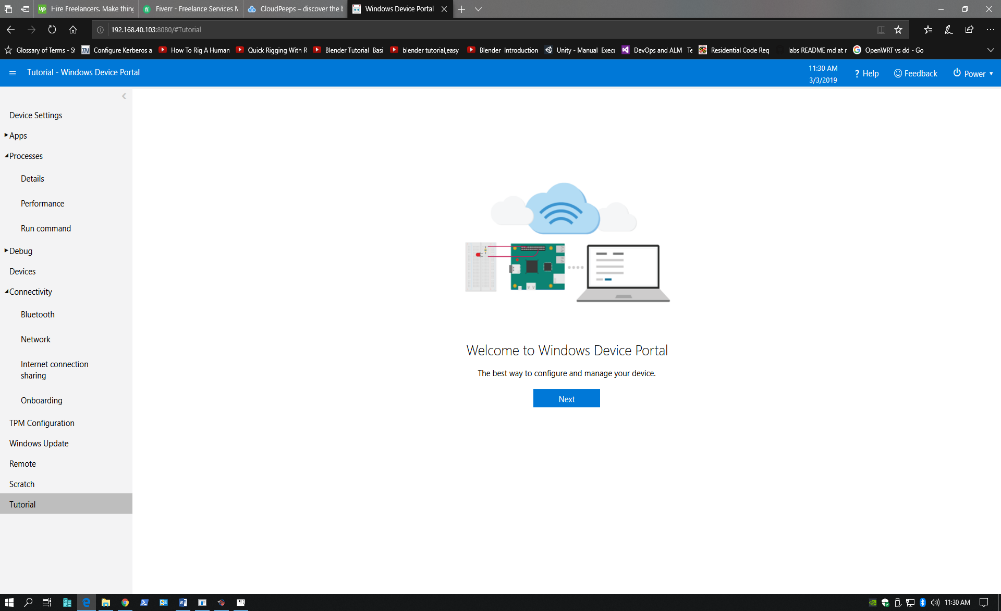
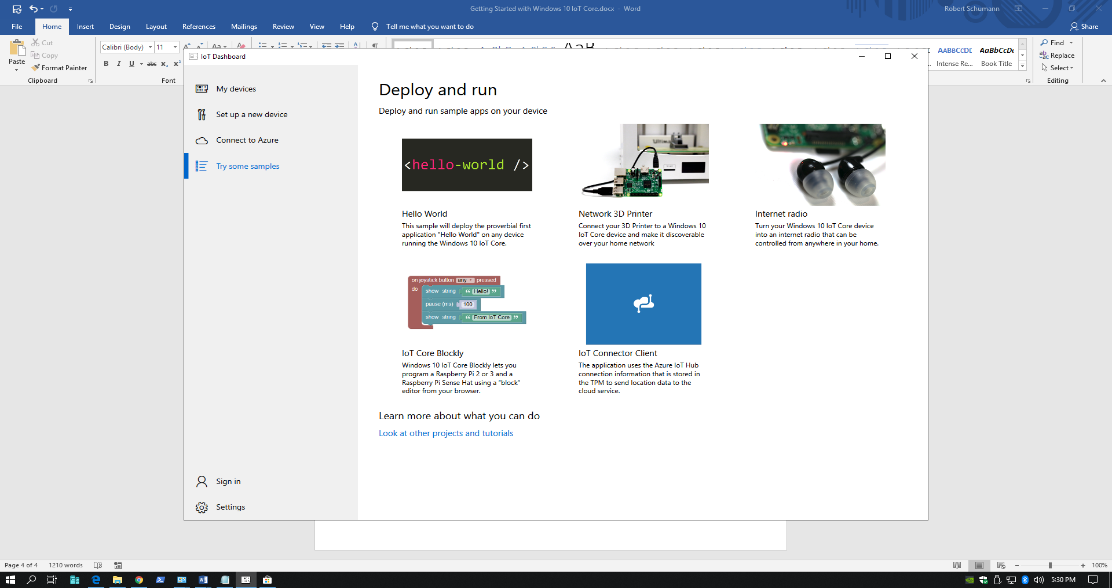
There are may more features in Windows 10 IoT Core to explore. Recommend starting with the device portal Tutorials option, lower left, to aid get upwardly-to-speed with navigating. In that location is likewise the dashboard Connect to Azure and Effort some samples for development.
Overall, I similar being able to repurpose my Raspberry Pi 3 B+. It makes sense that Microsoft wants to enable and optimize border devices. Extending the Windows ecosystem via Windows 10 IoT Core and being able to run information technology on an expanded list of devices certainly helps. Similar nearly emerging engineering, Windows 10 IoT Core is evolving, and I look forrad to time to come enhancements and capabilities.
![]()
Developer Support App Dev Client Success Business relationship Manager, Microsoft Developer Support

How To Download Windows 10 Iot Core For Raspberry Pi 3 Without Having A Pc,
Source: https://devblogs.microsoft.com/premier-developer/getting-started-with-windows-10-iot-core-raspberry-pi-3b/
Posted by: torresposelver.blogspot.com
0 Response to "How To Download Windows 10 Iot Core For Raspberry Pi 3 Without Having A Pc"
Post a Comment